When you type a website into your address bar like “Fisthost.com” your computer doesn’t actually know where to go on its own. Instead, it looks that address up on a Domain Name System (DNS) server, which matches it with an IP address for your computer to visit.
Anyone who moves about on the internet leaves a lot of traces – even inexperienced browser users probably know this by now. Website operators use technology such as cookies or JavaScript applications to record the behavior of visitors. The data obtained here is used to optimize the website and personalize the content without users actively disclosing personal details. Many users increasingly rely on ad and JavaScript blockers and proxies or delete history and cookies to put an end to data collection and protect their own privacy.
However, very few users are aware that the operating system also saves information about surf behavior: for example, the automatically generated DNS cache contains temporary entries about all visited websites. The following sections explain exactly what this cache is all about and why there are several reasons to delete the DNS cache regularly.
What is the DNS cache?
DNS servers are used to convert domain names such as www.example.com into numerical addresses that can be processed by computer systems. These “name servers” are contacted by default via the browser each time the corresponding projects are accessed, which slightly increases their loading time and can also lead to a DNS server overload in the case of a high number of visitors. Error messages like “DNS Server Not Responding” are a common and despised consequence.
For this reason, operating systems like Windows and macOS attach their own cache for called and resolved addresses – the DNS caches. These save all information that’s relevant for name resolution, each with an entry known as TTL (time to live) where data remains valid for a given time. Within this time, corresponding queries are answered directly from the cache without requiring a detour to the DNS server.
How to flush DNS
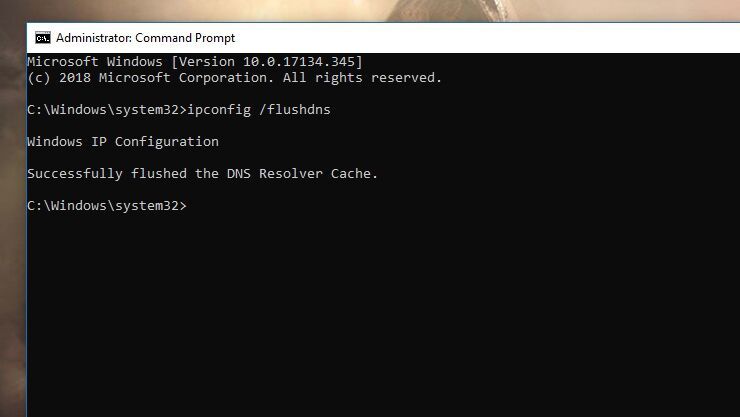
As a user of Windows 7, you can run a DNS flush via the command prompt. To use this, click on the Windows home button and type “cmd” into the search bar. Then start the command line tool by clicking or pressing enter.
Enter the following command:
ipconfig /flushdnsWhen you press enter, Windows clears the DNS cache. You’ll receive the following message confirming that the cache was successfully flushed.
Run a DNS flush on Linux: how it works
Linux systems don’t have a DNS cache by default. The different distributions only offer a function to store DNS information locally with the use of appropriate applications like nscd (name service caching daemon), pdnsd, dns-clean, or dnsmasq. If you use one of these services for caching, you have to control it from the terminal in order to clear the cache.
For pdnsd, there’s a concrete clear command:
sudo pdnsd-ctl empty-cacheTo clear the DNS cache from dnsmasq, dns-clean, or ncsd, though, you need to completely restart the respective service:
sudo /etc/init.d/dnsmasq restart
sudo /etc/init.d/nscd restart
sudo /etc/init.d/dns-clean restart
How to flush DNS on Mac
Like Windows, macOS has an integrated DNS cache that automatically collects DNS information and so should be cleared regularly. As opposed to the Microsoft systems, though, the command for resetting the cache varies from version to version. What you need to enter into the terminal to set the DNS register back to zero depends on the edition that you’re working with:
macOS 10.12.0 (Sierra):
sudo killall -HUP mDNSResponderOS X 10.10.4 (Yosemite) and 10.11.0 (El Capitan):
sudo dscacheutil -flushcache;
sudo killall -HUP mDNSResponder
OS X 10.10.1 to 10.10.3 (Yosemite):
sudo discoveryutil mdnsflushcache
sudo discoveryutil udnsflushcaches
OS X 10.9.0 (Mavericks):
sudo dscacheutil -flushcache;
sudo killall -HUP mDNSResponder
Google Chrome browser
The Google Chrome web browser maintains its own internal DNS cache. To clear it, follow these steps:
- Start Google Chrome.
- In the address bar, type chrome://net-internals/#dns. Google Chrome displays a list of hosts in its internal DNS cache.
- Click Clear host cache.
- In the address bar, type chrome://net-internals/#sockets.
- Click Close idle sockets, and then click Flush socket pools.
9 Reviews


